The Sage Library Tree
The Sage Library Tree provides a visual for the structure of the
entire Sage library.
It contains the following nodes:
C
The tree updates its selection to track with the cursor as it
moves around in the editor. This way, each time you go to the
library tree, you begin in the tree from your current location.
To expand or collapse recursively, hold ^ Ctrl while
clicking on a node's expand / collapse arrow.
The following actions are available on the tree's right click menu:
C
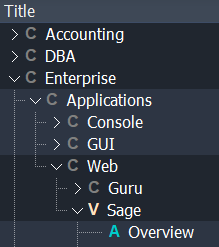
Category nodes represent a Sage category.
These indicate the folder structure above Sage volumes.
For example, the current volume is located in:
/Volumes/Enterprise/Applications/Web/Sage/Sage.vol.sage
The category nodes above the Sage volume are Enterprise,
Applications, and Web.
The final folder, Sage in this example, will only become a
category node if it contains more than one volume. Here, Sage
is the only volume in the folder, so the Sage category node is
omitted.
V
Volume nodes represent a Sage volume.
@
Vol MC nodes represent a volume script.
T
Topic nodes represent a Sage topic.
A
Article nodes represent a Sage article.
S
Section nodes represent a Sage section.
H
Here nodes represent a Sage here tag.
R
Resource nodes represent a file that has been included, but is
not otherwise represented in the tree. This could be a Sage file
that has no structure tags, or a file that was included by a
MiniCalc script.
| ^ Ctrl + T | Pin Node |
| F12 | Only Show Pinned Nodes |
| ⇧ Shift + ^ Ctrl + T | Clear All Pinned Nodes |
| F6 | Select Visible Nodes by Kind |
| ^ Ctrl + W | Show Hint, Warning, and Error Icons |
| ^ Ctrl + D | Dim Ambiguous Titles |
| ^ Ctrl + F | Search |
| ^ Ctrl + N | Next Search Hit |
| ^ Ctrl + P | Previous Search Hit |
| Ins | Add Sage File |
| ^ Ctrl + G | Go To Source |
| ^ Ctrl + E | Windows Explorer |
| ⌥ Alt + F8 | Focus Main Form |
| F5 | Force Library Refresh |
By default, all kinds of tree nodes are visible. This can be
customized using the "Selected Visible Nodes by Kind" action.
Here is the tree, including category nodes:
 Here is the tree with category nodes hidden:
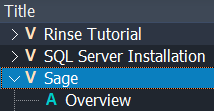
 Here is the tree with category nodes hidden:

The tree has an option to display icons for hints, warnings,
and errors. This option is off by default; to enable it,
right-click in the tree view, and toggle the "Show Hint,
Warning, and Error Icons" menu item.
For example…
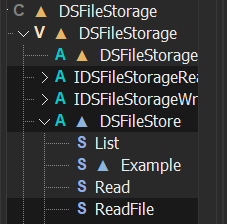 Above, the yellow triangles indicate warnings, the blue indicate
hints, and (not shown) red indicate errors. These colours
correspond to the ones used in the
preview messages grid.
 Above, the yellow triangles indicate warnings, the blue indicate
hints, and (not shown) red indicate errors. These colours
correspond to the ones used in the
preview messages grid.
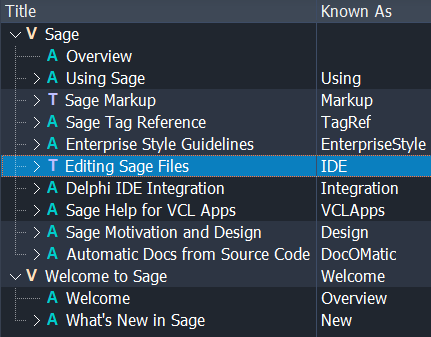
The tree has an option for dimming titles that are considered
ambiguous and cannot be linked to.
For example…
 Here we see that the article "Overview" under "Sage Markup" is
dimmed, but "Overview" under the volume is not. The volume
overview can be linked to because all other articles in the
volume entitled "Overview" have valid aliases. The topic's
overview may only be linked to by its alias, "SageMarkup", so
its title has been deemphasized.
While authoring documentation, it is common to focus on a
particular volume or handful of volumes. This can also be done
in the tree, by pinning particular nodes.
Use the "Pin Node" action on the pop up menu to add the selected
node to your pinned nodes. Use the same action to unpin a node.
When you pin a new node, the tree will display only your pinned
nodes. To toggle this, use the "Only Show Pinned Nodes" action
on the pop up menu.
 To clear all pinned nodes, use the "Clear All Pinned Nodes"
action on the pop up menu.
 To clear all pinned nodes, use the "Clear All Pinned Nodes"
action on the pop up menu.
Double click in the tree, press enter, or use the "Go To Source"
action on the pop up menu to open the source for a node.
Use the "Windows Explorer" action on the pop up menu to view the
sage source file in the Windows explorer.
Use the "Search" action on the pop up menu to open the
tree search panel.
 The hamburger button to the right of the search combo will
display the search history. The arrows will search for previous
and next. And the ∅ button will clear the current
search.
There are several search options, which persist for each user.
All Nodes
Search hits are highlighted in the tree.
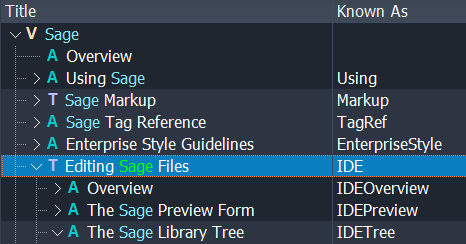 The current hit is green, and the others are blue.
Moving through the search hits will take you to the next or
previous matching node in the tree. To go to the source
location, hit ↵ Enter or double click the node.
When the search includes Source or Content hits, those are
indicated by a blue or green ★.
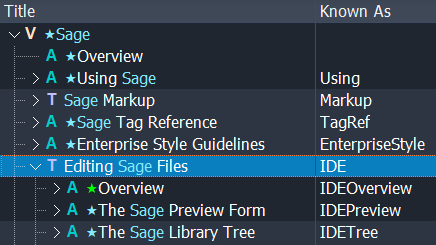 When moving through Source or Content search hits, the
search will pass between the tree and the editor, taking you to
the sage code that matched the search, and tracking along in the
tree.
 The hamburger button to the right of the search combo will
display the search history. The arrows will search for previous
and next. And the ∅ button will clear the current
search.
There are several search options, which persist for each user.
All Nodes
By default, the search only applies to nodes that are visible.
Enable this option to search all nodes in the library,
regardless of what nodes are pinned.
Title
Include volume, topic, and article titles in the search.
Alias
Include volume, topic, article, and here tag aliases in the search.
Source
Include all .sage source file text in the search.
This is a much more intensive search than simply searching in
the tree. Consider searching pinned nodes to improve performance.
Content
Include article plain text in the search.
The plain text is what drives the search
feature.
This is a much more intensive search than simply searching in
the tree. Consider searching pinned nodes to improve performance.
Whole Word
Match on whole words only.
Case Sensitive
Enables case sensitive searching. One use case for this is to
find tags that are capitalized incorrectly by searching Source
with Case Sensitive enabled.
From Top
Restart search from the top of the tree, instead of continuing
from the last viewed search hit.
 The current hit is green, and the others are blue.
Moving through the search hits will take you to the next or
previous matching node in the tree. To go to the source
location, hit ↵ Enter or double click the node.
When the search includes Source or Content hits, those are
indicated by a blue or green ★.
 When moving through Source or Content search hits, the
search will pass between the tree and the editor, taking you to
the sage code that matched the search, and tracking along in the
tree.
Use the "Add Sage File" action on the pop up menu to open the
add file panel to create a new sage document.
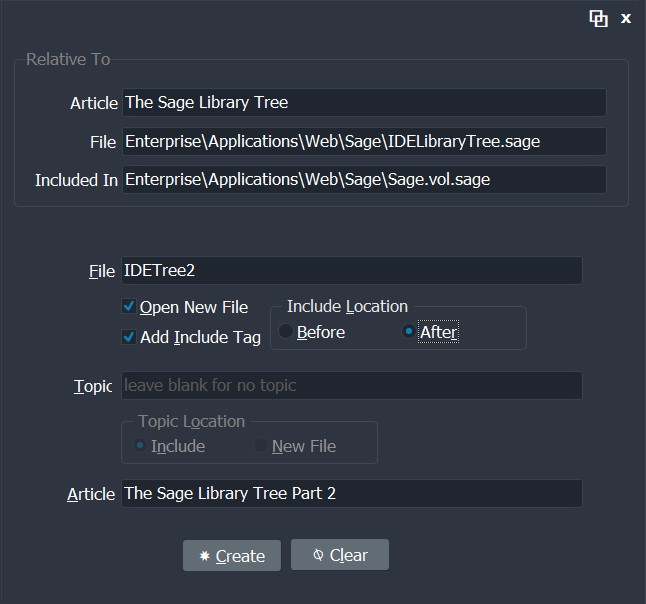 Depending on how wide the tree is, this panel may appear in a
separate form or it may appear at the bottom of the tree form.
Use the ⧉ button to dock and undock the panel in the
tree form.
Relative To
 Depending on how wide the tree is, this panel may appear in a
separate form or it may appear at the bottom of the tree form.
Use the ⧉ button to dock and undock the panel in the
tree form.
Relative To
- The new filename will be relative to this File.
- The optional, generated include tag will be relative to this Included In location.
- To select a different node to insert a file relative to, either hold the ⌥ Alt key while select a different node in the tree, or select the node and press the Ins key.
- The new sage file name.
- Relative paths will be expanded from the folder of the Relative To File.
- The .sage extension will be automatically appended if the filename does not already end with it.
- Enabling this option opens and focuses the new file in the editor.
- If you are creating many new files, you may want to disable this option. It can cause a lot of screen dancing.
- Enabling this to generate an include tag for the new file.
- Selecting Before will generate the include tag before the Relative To include tag in the Included In file. After will do the same thing, but generate it after the Relative To include tag.
- Enabling this causes a new topic to be generated for the new file.
- Selecting New File will place the new topic in the new file. If an article is also generated, it will appear inside the generated topic.
- Selecting Include will place the new topic around the new include tag in the Included In file.
- Leave this edit blank to not generate a new topic.
- Enabling this causes a new article to be generated in the new file.
- If the article title contains whitespace, an alias will automatically be generated by starting with the title and stripping the whitespace.
- If a topic was generated in the new file, the article will appear inside the new topic.
- Leave this edit blank to not generate a new article.
⏱ Last Modified: 1/6 11:08:10 am