Editing Sage Content
This section describes all of the Sage-related features in
DSEdit.
On the main editor form, just below the main menu,
you will find the Sage Tool Bar.
This tool bar offers several editor commands related to Sage.
These are discussed in detail in the following sections.
The first four buttons on the tool bar implement the four
basic font options:
bold, italic, underline, and monospace.
To use one of these commands, either select a region of text,
or simply put the editor cursor on the desired word.
Click the button, or use the corresponding hotkey:
If you select some text before executing the command,
the command will apply to the selection;
otherwise, it will apply to the word under the cursor.
Either way, if the relevant text already has the font option
corresponding to the command you executed, DSEdit will remove
the font option.
In other words, these commands toggle: if you select a word,
then hit ^ Ctrl+B to bold it,
then immediately hit ^ Ctrl+B again,
you will effectively undo the bold.
| Option | Button | Shortcut | Sage Syntax |
|---|---|---|---|
| Bold | B | ^ Ctrl+B | *...* |
| Italic | I | ^ Ctrl+I | /.../ |
| Underline | U | ^ Ctrl+U | ~...~ |
| Monospace | M | ^ Ctrl+M | `...` |
These tool buttons work like the commands for
Bold, Italic, etc.,
but for the [^] and [v]
tags.
These buttons offer the shortcuts
⇧ Shift+^ Ctrl+Y for superscript,
and ⇧ Shift+^ Ctrl+V for subscript.
The tool bar offers several buttons for specific
Sage tags related to font formatting.
Each button's caption indicates the corresponding Sage tag,
and they work much like the buttons for
Bold, Italic, etc.
One difference, however, is that these commands always
require a selection (except for [end], which requires
there to not be a selection).
| Button | Option / Example | Shortcut |
|---|---|---|
| [b] | Bold | |
| [i] | Italic | |
| [u] | Underline | |
| [m] | Monospace | |
| [s] | | ⇧ Shift+^ Ctrl+O |
| [tt] | Teletype | ⇧ Shift+^ Ctrl+T |
| [kw] | keyword | ⇧ Shift+^ Ctrl+K |
| [kbd] | Keyboard | ⇧ Shift+^ Ctrl+B |
| [hl] | Highlight | ⇧ Shift+^ Ctrl+H |
Use the Lang button to enclose text in Sage tags
for syntax highlighting in one of
the supported source languages.
After you use a language, the caption of the Lang button
changes to the corresponding file extension.
Subsequently, clicking the Lang button
(^ Ctrl+K) will re-apply
the most recently used language.
The Insert button (⇧ Shift+^ Ctrl+I)
drops down a menu with several options for inserting
Sage tags for special characters and symbols.
After you select a menu item, the button's caption becomes
the menu item, indicating that subsequent clicks of the
button (or using the keyboard shortcut) will re-insert the
most recently used character.
There are also a number of sub-menus, to keep things tidy.
The Section button, a green circle with white plus sign
(⇧ Shift+^ Ctrl+S),
creates a new article section.
You can use this command to create a new, empty section.
Alternatively, you can select a range of text before
invoking this command, and DSEdit will wrap the selection
in a Sage [section] tag.
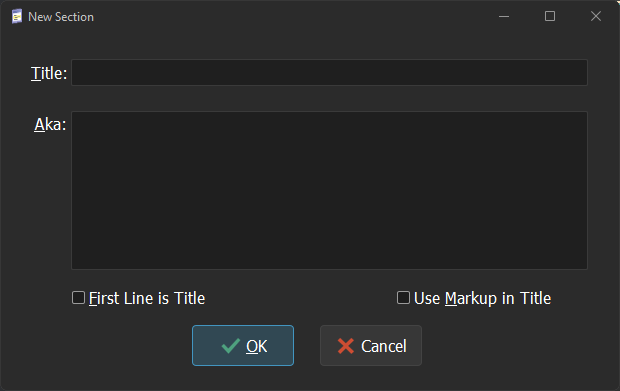
When you run this command, the following dialog appears…
 Enter the section title in the Title edit box.
If you are converting a Word doc, it is likely that
the section title is the first line in the selection –
if so, simply check the First Line is Title option at
the bottom of the form, and the dialog will automatically
move the first line into the section title.
If you want to provide aliases to the section,
enter them (one per line) in the Aka memo.
Finally, if you want to use Sage markup in the title,
check the Use Markup in Title option.
This option automatically uses the
[title] tag.
On the main tool bar (below the Sage tool bar),
the Size button offers a drop-down with the six Sage tags
for adjusting the font size.
This button uses the shortcut ⇧ Shift+^ Ctrl+Q.
To the right of the Size button,
DSEdit offers several buttons for insert Sage
font formatting tags…
Except for [end], the above buttons require a selection
(or they apply to the current word under the cursor),
and they insert both the starting and ending tags.
| Button / Tag | Shortcut |
|---|---|
| [list] | ⇧ Shift+^ Ctrl+L |
| [box] | ⇧ Shift+^ Ctrl+X |
| [code] | ⇧ Shift+^ Ctrl+C |
| [html] | ⇧ Shift+^ Ctrl+W |
| [indent] | ⇧ Shift+^ Ctrl+D |
| [plain] | ⇧ Shift+^ Ctrl+A |
| [pre] | ⇧ Shift+^ Ctrl+F |
| [end] | ⇧ Shift+^ Ctrl+E |
The list option on the Blocks menu is more involved
than the others.
This command builds a Sage list from existing text,
and is especially handy when converting Word documents
to Sage.
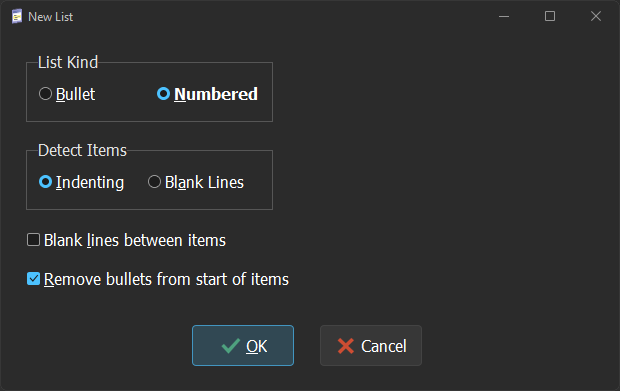
It uses the following dialog:
 The dialog will attempt to detect whether your list is
unordered (using bullets) or ordered (using numbers).
If it detects either of these, it will also offer to
remove the old bullets/numbers from the start of each line
(if you disable this, you'll have to remove them yourself).
You can also switch to the other option, by the way.
If the dialog can't detect whether your list uses bullets
or numbers, you'll have to pick an option.
The Detect Items group box tells the form how it should
detect list items: either based on indenting, or blank lines.
With the Indenting option, every line makes a new item,
unless it is indented. For example:
abc
def
ghi
jkl
mno
pqr
stu
Above, the dialog will create four list items:
[list]
#* abc
def
#* ghi
#* jkl
mno
pqr
#* stu
[end]
The other option is Blank Lines.
With this option, the form makes list items whenever it sees
a blank line:
abc
def
ghi
jkl
mno
pqr
stu
The above also represents four list items,
just like in the previous example.
Finally, the Blank lines between items option controls
whether the list will contain a blank line between items
(and also one before the first item).
⏱ Last Modified: 1/6 11:08:10 am